

Table of Contents
- What Makes a DCC Decoder Right for an Older Locomotive?
- Quick Comparison: Decoder Types and Installation Options
- DCC Decoder Installation Without a Socket
- DCC Decoder Motor Isolation: The Step That Protects Your Decoder
- Small DCC Decoders for Model Trains With Tight Bodies
- DCC Sound Decoder Compatibility in Older Locomotives
- Testing and Troubleshooting After Fitting DCC Decoders
- Conclusion
- Frequently Asked Questions
Last Updated: 18 October 2026
What Makes a DCC Decoder Right for an Older Locomotive?
Fitting DCC to an older locomotive is rarely plug-and-play, and choosing the best DCC decoders for older locomotives starts with three hard limits: physical space inside the body, whether the motor can be isolated from the chassis, and how much current the motor draws. Older mechanisms often run on three-pole motors, which need a decoder with adjustable motor control rather than a fixed preset. HobbyTrax supplies decoders, wiring and installation parts for exactly this kind of retrofit work.
Hobby Trax Helpsheet - Hardwiring DCC decoders
Decoder choice follows the locomotive, not the other way round. A decoder with a socket suits a DCC-ready model. A hardwired decoder suits a loco with no socket at all, which describes most older stock.
Quick Comparison: Decoder Types and Installation Options
Four installation routes cover nearly every older locomotive, and each suits a different level of confidence and body space.
Decoder Type |
Fits |
Installation Effort |
Best For |
|---|---|---|---|
6-pin, 8-pin or 21-pin socket decoder |
Locos with a factory socket |
Low, plug in and test |
DCC-ready models |
Hardwired decoder or Decoder Harness (6, 8-pin female) |
No socket, wired direct to motor and pickups |
Moderate, needs soldering |
Older and kit-built locos |
Compact wired decoder |
Tight bodies, small tanks and shunters |
Moderate, careful routing |
Small locomotives |
Sound decoder with speaker |
Bodies with room for a speaker |
Higher, needs speaker placement |
Locos with visible space |
Older models almost always land in the hardwired or compact wired rows. Our free Understanding DCC decoder types helpsheet explains the connector families.

DCC Decoder Installation Without a Socket
Hardwiring is the standard path for an older locomotive, and it means soldering the decoder's wires directly to the motor terminals and track pickups. The sequence matters more than the speed.
- Remove the body and photograph the wiring before you touch anything.
- Test the loco on analogue DC first so you know it runs.
- Identify the two motor terminals and the pickups from each side.
- Cut the motor's existing connection to the pickups so the motor is fed only by the decoder.
- Solder the decoder's track wires to the pickups and its motor wires to the motor terminals.
- Insulate every joint, then test on a programming track before refitting the body.
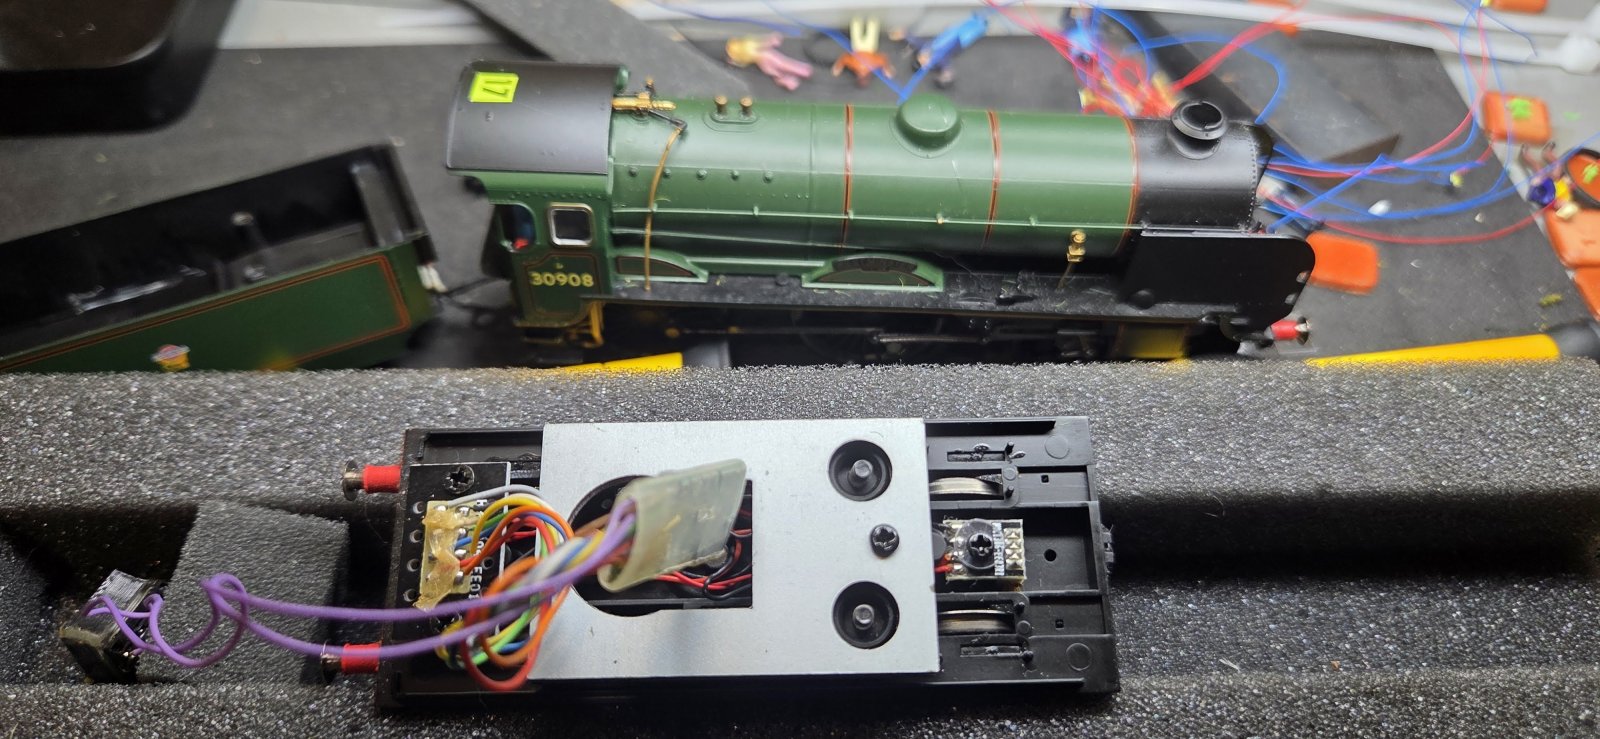
Our free Hardwiring DCC decoders helpsheet walks through the same steps with the wiring order laid out. Thin wire helps here: our 7/0.1mm ultra-thin decoder wire has a 0.6mm overall diameter and comes in ten colours.

DCC Decoder Motor Isolation: The Step That Protects Your Decoder
Motor isolation is the process of breaking the electrical connection between the motor brushes and the locomotive's chassis and pickups, so the motor receives power only through the decoder. Skip it and the decoder's output is shorted straight to track power.
On older models the motor often earths through the chassis by design. That single contact will destroy a decoder the moment track power reaches it. Check with a multimeter set to continuity: probe each motor terminal against the chassis. A beep means isolation is needed before anything is soldered.
Small DCC Decoders for Model Trains With Tight Bodies
Space is the deciding factor in small tanks, shunters and older bodies with cast metal weights filling the cavity. A compact wired decoder with a short harness fits where a socket board never will.
Wire routing matters as much as decoder size. Keep wires flat against the body, avoid trapping them under the weight, and insulate anything that could rub through against metal. Kapton tape is useful here because it is thin and heat resistant, and our Kapton tape can secure a decoder and insulate it from surrounding components without the bulk of conventional electrical tape. A small piece of decoder mounting putty holds a decoder or speaker firm without permanent adhesive.
DCC Sound Decoder Compatibility in Older Locomotives
Sound in an older locomotive hinges on speaker space and impedance matching, not on the decoder brand. A sound decoder needs a speaker of the impedance it specifies, and most specify 8 ohm. Fitting the wrong impedance can damage the audio output.
Our 8 ohm sugar cube speaker measures 16mm x 13mm x 17mm in its sealed enclosure and suits sound decoders requiring an 8 ohm speaker, including ESU LokSound and Hornby TTS. Point the speaker upwards or forwards inside the body; aimed down at the track, the sound turns muddy.
Older three-pole motors can run jerky at low speed on sound decoders. Many sound decoders include an auto-tune function that assesses the motor and sets its own values, and our Loksound smoother running helpsheet explains how to use it.
Testing and Troubleshooting After Fitting DCC Decoders
Test before the body goes back on, every time. A DCC decoder tester lets you check a decoder's motor and lighting functions outside the locomotive, and it handles 6-pin, 8-pin and 21-pin decoders up to six functions as well as hardwired decoders, with any DCC controller.
Common faults after a retrofit follow a short list:
- No movement: motor wires crossed or a joint not soldered through.
- Runs one direction only: motor still partly connected to a pickup.
- Decoder resets on points: poor pickup contact or a short at the frog.
- Jerky low speed: motor control values need adjusting, often on older three-pole motors.
If a 21-pin connector has bent pins, our bent pins helpsheet covers the recovery. For Hornby decoders with running problems, our Hornby decoder helpsheet lists the tweaks worth trying.
Conclusion
The best DCC decoders for older locomotives are the ones that fit the body, match the motor's current draw, and sit behind proper motor isolation. Get those three right and the rest is wiring discipline. If you're unsure which decoder suits a particular model, ask us about compatibility before you order.
Retrofitting an older locomotive is one of the most satisfying jobs in the hobby, and it gets easier with the right parts on the bench. Browse our DCC and electronics range to match a decoder, wire and insulation to your model, and ask us if you'd like a second opinion on fit before you commit.
A note from HobbyTrax: This article reflects our practical modelling experience and information available at the time of writing. Products, specifications and technology can change, so check current manufacturer instructions and compatibility before starting a project.
Frequently Asked Questions
Can you fit a DCC decoder to an older locomotive?
Yes, in most cases. Older locomotives without a decoder socket can be converted by hardwiring a decoder directly to the motor and pickups. The key is to isolate the motor from the track pickups first, then wire the decoder's track inputs to the pickups and its motor outputs to the motor. A free helpsheet on hardwiring DCC decoders walks through the process. Check that the motor draws a reasonable current and that there is physical space inside the body before choosing a decoder.
Do older locomotives need a motor-isolation modification before DCC conversion?
Yes, if the motor is wired directly to the track pickups. DCC decoder motor isolation means disconnecting the motor terminals from the pickups and any common return so the motor only receives power through the decoder. Without isolation, track voltage can reach the motor uncontrolled and may damage the decoder. On many older models the motor is earthed to the chassis, so you may need to insulate the motor from the frame as well as cut the pickup connections.
What size DCC decoder will fit my locomotive?
Measure the internal space first, allowing room for the decoder, wiring and any speaker. Small DCC decoders for model trains are available in compact wired and plug-in formats, and a sugar cube speaker in its enclosure measures roughly 16 mm x 13 mm x 17 mm. If space is very tight, an ultra-thin decoder wire with a 0.6 mm overall diameter helps route connections without bulk. A free helpsheet on understanding DCC decoder types explains the common connector formats.
Is a sound decoder suitable for an older locomotive?
It can be, but DCC sound decoder compatibility depends on space and speaker matching. Sound decoders need a speaker of the correct impedance, commonly 8 ohm, and the speaker must fit inside the body with the sound facing upwards or forwards. Older locomotives often have less internal room, so a compact sugar cube speaker is a practical choice. Test the decoder and speaker outside the locomotive first if possible, and check the manufacturer's instructions for the correct speaker rating.
What should I do if an older locomotive runs poorly after a DCC conversion?
Start by checking the basics: confirm the motor is fully isolated, inspect solder joints for bridges, and make sure the decoder is rated for the motor's current draw. If low-speed running is jerky, the decoder's motor tuning settings may need adjustment; some decoders can assess the motor and suggest values, and a free helpsheet covers smoother running with Loksound decoders. Also clean the wheels and pickups, as older models often suffer from poor contact that shows up more clearly under DCC.