

Last Updated: 4 November 2026
Quick Summary
To inspect and repair model railway track, isolate the power, inspect the whole run visually, then run a known-reliable locomotive slowly in both directions to locate the fault. Test continuity with a multimeter, repair the cause, and retest at several speeds before returning the layout to service.
- Work in a set order: isolate power, inspect visually, run a reliable locomotive, locate the fault, test, repair, retest.
- Hesitation at one spot usually means a loose joiner or poor dropper connection.
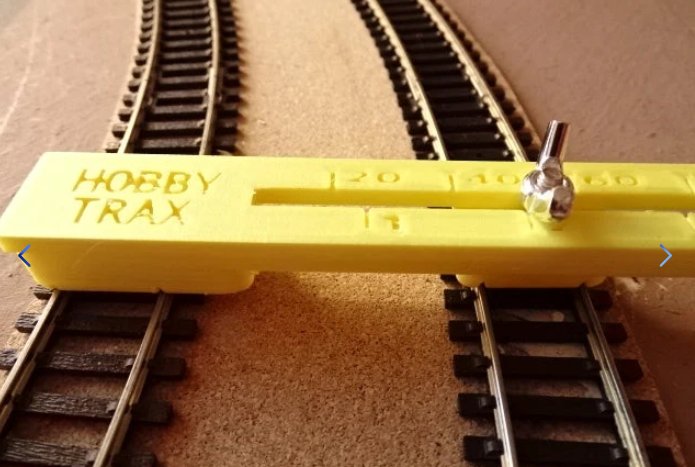
- Check Adjustable Track Spacer and Alignment Tool through curves; a derailment at one radius often means the curve is too tight.
- Replace rather than repeatedly repair track with cracked sleepers, deformed rail or a worn frog.
Table of Contents
- A Logical Process for Inspecting and Repairing Model Railway Track
- Model Railway Track Troubleshooting: From Symptom to Fault
- Using a Multimeter for Model Railway Electrical Work
- Model Railway Track Alignment, Gauge and Curve Radius
- How to Fix Loose Model Railway Rail Joiners and Dropper Connections
- Repairing Kinks, Uneven Joints and Loose Track
- Adjusting Troublesome Points and Knowing When to Replace Track
- Explore HobbyTrax Track and Maintenance Supplies for Your Layout
- Frequently Asked Questions
A Logical Process for Inspecting and Repairing Model Railway Track
A reliable layout starts with a simple habit: inspect before you repair. Model railway track is a precision assembly of rail, sleepers, joiners and feeds, and small faults compound quickly. A methodical inspection catches most problems before they cost you a derailment.
Work in this order every time:
- Isolate power at the controller or command station.
- Inspect visually along the whole run, rail top to baseboard joint.
- Run a known-reliable locomotive slowly, both directions.
- Locate the exact fault, then test continuity where appropriate.
- Repair, then retest at several speeds in both directions.
Skipping straight to repair usually means fixing the symptom, not the cause.
The warning signs that point to a track fault
Hesitation, flickering lights, derailments, clicking wheels, visible gaps, loose joiners, uneven rail heights and dead sections all point to track faults. Each symptom narrows down where to look. A locomotive that stumbles at one spot suggests a feed or joiner issue; a wheel that clicks suggests a gauge or joint problem.
If hesitation or flickering appears, rule out dirty rail first before you start pulling up track.
When a Motorised Track-Cleaning Wagon Helps
Before lifting or repairing track, rule out contamination on the rail heads. For larger HO/OO layouts and difficult-to-reach areas, the Dapol B800 Motorised Track Cleaning Wagon can make routine cleaning considerably easier.
Despite its name, the B800 is not self-propelled and must be hauled by a locomotive. Its motor powers the interchangeable cleaning or vacuum equipment. Depending on the attachment fitted, it can vacuum loose material, apply compatible cleaning fluid, brush, scrub or polish the rail. It is DCC-ready rather than DCC-fitted, so a suitable decoder is required for DCC operation.
It is a useful maintenance tool, but not a complete solution. Points, electrical feeds, rail joiners, locomotive wheels and inaccessible sections still require inspection and occasional manual cleaning.
Watch GranddadsTrains short YouTube video: Clean Track Properly – is the Dapol B800 Motorised Track Cleaning Wagon the way to go?
Model Railway Track Troubleshooting: From Symptom to Fault
Model railway track troubleshooting works best when you match each symptom to its most likely cause before touching anything. The table below is the shortcut we use on our own layouts.
Symptom |
Most likely cause |
First check |
|---|---|---|
Locomotive hesitates at one spot |
Loose joiner or poor dropper |
Joiner fit and feed wire |
Lights flicker or dim |
Intermittent electrical contact |
Continuity across the joint |
Derailment on a curve |
Gauge, alignment or radius issue |
Alignment tool |
Clicking wheel |
Wide gauge or raised rail joint |
Rail height and gauge |
Dead section |
Broken feed or failed joiner |
Multimeter continuity test |
Uneven running over a joint |
Rail height mismatch |
Fine file and straight edge |
Start with the simplest cause. Most faults trace back to a joiner, a feed or a joint that has moved.
Finding That Mystery Dead Section
Every layout seems to have one spot where a locomotive unexpectedly hesitates or stops. The cause may be dirty rail, a loose joiner, a failed dropper or an intermittent connection beneath the baseboard.
Watch the fault-finding process in the GranddadsTrains YouTube short video: Mystery dead section—every layout has that one spot. Where’s yours?
Use the location where the locomotive stops as your starting point, then inspect, test and repair the cause rather than repeatedly cleaning the symptom.
Using a Multimeter for Model Railway Electrical Work
A multimeter for model railway electrical work is the fastest way to prove whether a fault is electrical or mechanical. Set it to continuity, isolate all power, and test across a suspect joint or between rail and dropper. A healthy joint reads near zero resistance; a loose or corroded one reads high or open.
Safety matters here. Never test live wiring. Isolate the controller or command station, check polarity before reconnecting, and keep one probe on a known-good reference point. If you're adding droppers or dividing the layout into power districts, our wiring guide walks through the steps in detail.
Watch out: testing continuity with power still connected can damage the meter and give false readings.
Model Railway Track Alignment, Gauge and Curve Radius
Model railway track alignment is the relationship between rail spacing, curve radius and joint height, and it decides whether stock runs smoothly. Gauge is the distance between rail heads; alignment is how true the rail runs; radius is how tight the curve is. All three affect running.
A track alignment tool helps keep tracks parallel at a consistent centre-to-centre spacing, even around bends. The adjustable track spacer and alignment tool is graduated and is available in N, TT and OO/HO gauge.
A common mistake is forcing tight curves to fit a baseboard corner. If stock derails consistently at one radius, the curve is likely too tight for that locomotive rather than faulty track.
How to Fix Loose Model Railway Rail Joiners and Dropper Connections
Loose model railway rail joiners are the most common cause of hesitation and dead sections, and they're usually quick to replace. A joiner that has spread, corroded or lost tension no longer carries current reliably. Isolate power, lift the rail ends gently, remove the old joiner and fit a fresh one with a firm push.
For droppers, check the solder joint at the rail first, then the connection below the baseboard. Re-solder only with the power off, using a hot iron and a quick touch to avoid melting sleepers.
Repairing Kinks, Uneven Joints and Loose Track
Kinks and uneven joints come from movement, expansion or track laid under tension. A kink shows as a sharp deviation in an otherwise smooth curve; an uneven joint shows as a step in rail height. Left alone, both cause derailments and clicking wheels.
For a kink, lift the affected section, ease the curve and re-secure. For an uneven joint, a fine file used lightly across the rail head can bring heights level, then check with a steel rule. If rail needs trimming, use proper track cutters rather than side cutters; our Trak-Kuts hardened nickel-silver track cutters are designed for a clean flush cut ready to accept a joiner.

Secure loose track with the correct pins or adhesive for your baseboard, and never work on live wiring while doing it.
Adjusting Troublesome Points and Knowing When to Replace Track
A troublesome point usually needs adjustment, not replacement. Check for debris in the frog, blade contact and any gauge issue through the crossing. Clean and test before assuming the turnout is worn out.
Replace rather than repeatedly repair when you see cracked sleepers, deformed rail, a worn frog that no longer carries current, or a blade that won't seat despite adjustment. Constant rework costs more time than a fresh turnout.
Fixing a replacement point follows the same isolation-and-test routine.
Explore HobbyTrax Track and Maintenance Supplies for Your Layout
Fault-finding gets easier with the right tools on the bench. A track rubber, re-railer, track cutters, alignment tool, multimeter, fine files and steel rule cover most inspections and repairs.
If you're unsure which part suits your layout, ask us about compatibility before you buy.
Frequently Asked Questions
How do you find a fault in model railway track?
Isolate the power first, then inspect the section visually for gaps, loose joiners, kinks or debris. Run a reliable locomotive slowly over the area and note where it hesitates, stops or derails. Use a multimeter on the DC voltage setting to check for power at the rails and test continuity across suspect joiners. Work from the symptom back to the cause, repair the fault, then test in both directions at different speeds before moving on.
Why does a model train hesitate or stop on the track?
Hesitation usually points to an intermittent electrical connection rather than a failed locomotive. Common causes include loose rail joiners, dirty rail heads, insufficient droppers on long sections, or a fishplate that has worked loose at a baseboard joint. Check the joiners and feeder wires first, then test continuity with a multimeter. If the train stumbles only in one spot, the fault is almost always local to that section of model railway track.
How do you test model railway track continuity with a multimeter?
With the power off and the controller disconnected, set your multimeter to the continuity or resistance setting. Place one probe on each side of a suspect joiner or rail joint. A healthy connection should show close to zero ohms or a continuous beep. If the reading is high or intermittent, the joiner is loose or corroded. Test each rail separately and never test while the layout is powered. A multimeter for model railway electrical work is one of the most useful diagnostic tools you can own.
How do you fix a loose rail joiner?
Slide the old joiner off with fine-nose pliers, inspect the rail ends for damage, and fit a new joiner that grips firmly. If the joiner is loose because the rail end is worn, trim the rail slightly with track cutters and refit. Where a soldered joint is appropriate, clean and solder it carefully. Do not solder every rail joint, as the track may need room for temperature-related expansion and contraction. Always disconnect the power and work in a well-ventilated area. Check the joint with a multimeter and run a locomotive over it before moving on.
How do you correct a kink or uneven joint in model railway track?
Lift the affected section carefully, check that the rail ends are square and level, and refit the joiner. If the baseboard has shifted, secure the track with track pins or adhesive after checking alignment with a steel rule. A fine file can smooth a slight height difference at the joint. For curves, check that the radius is consistent and use an alignment tool to keep parallel tracks even. Test with a locomotive at slow speed in both directions after the repair.
How can you tell if a model railway turnout needs replacing?
If a turnout repeatedly derails locomotives or rolling stock after you have checked gauge, cleaned the rails and adjusted the point blades, the fault may be worn or damaged components. Look for bent point blades, a loose frog, cracked sleepers or a blade that no longer sits flush against the stock rail. If repairs do not hold after two or three attempts, replacement is usually more reliable than ongoing patching. Check the turnout with a steel rule and a multimeter before deciding.
How do track gauge and curve radius affect model train running?
Track gauge is the distance between the inner faces of the rails. If it is too wide or too narrow, wheels will not sit correctly and derailments follow. Curve radius matters too: tighter curves force wheels against the rail and increase the risk of binding, especially on longer rolling stock. Check both with a steel rule and an alignment tool. If your curves are tighter than your longest locomotive recommends, derailments will persist no matter how well you maintain the track.
How often should model railway track and its electrical connections be inspected?
A quick visual check before each running session is worthwhile, and a full inspection every few months keeps small faults from becoming major ones. Look at joiners, droppers, point blades and baseboard joints. If your layout lives in a shed or garage, inspect more often because temperature and humidity changes affect track and wiring. Keep a simple checklist and note any recurring faults so you can track them over time.
A note from HobbyTrax: This article reflects our practical modelling experience and information available at the time of writing. Products, specifications and technology can change, so check current manufacturer instructions and compatibility before starting a project.
