

Table of Contents
- How Model Railway Products Australia Wide Bring Layouts to Life
- Cable, Wire, Connectors and Power Distribution for DC and DCC Model Railway Supplies
- DCC Systems, Decoder Accessories and Stay-Alive Modules
- Beginner Model Railway Wiring: What to Check Before You Connect Anything
- LEDs, Streetlights and Model Railway Track Cleaning Tips
- DCC Decoder Installation Guide: Matching Decoders to Your Locomotives
- Modular Model Railway Viaduct, Platform System and Scenery Options
- Tools, Maintenance, Turnouts and Pre-Owned Trains
- Frequently Asked Questions
Last Updated: October 2, 2026
How Model Railway Products Australia Wide Bring Layouts to Life
A model railway is only as good as the parts underneath it. This guide from HobbyTrax covers the model railway products that genuinely change how a layout runs, from the first length of bus wire to the last streetlight on the platform. We stock DC and DCC model railway supplies, and we have spent years helping beginners and long-time modellers get their trains moving reliably.
Model railway products are the components, wiring, electronics, track, scenery and tools that turn a set of rails on a board into a working miniature railway. Good ones improve reliability, realism and enjoyment; poor ones cause stalls, shorts and burnt-out LEDs.
Below, we break down each category, explain what to check before you buy, and point you to the products we actually stock. The HobbyTrax owner has collected model trains in Australia for more than 50 years and understands both the satisfaction and the occasional frustration of building a layout. That experience shapes what we recommend.
Cable, Wire, Connectors and Power Distribution for DC and DCC Model Railway Supplies
Power distribution is where most layout faults begin. Thin wire and loose joints cause voltage drop, so locomotives slow down at the far end of the track.
For a DCC bus, use a heavier gauge pair for the main run and lighter droppers from the rails. Keep droppers short and solder them rather than relying on rail joiners alone. Our NMRA DCC wiring and recommended practices guidance is a useful reference for bus sizing.

The Hydra 16-Channel DC/DCC Bus Bar with Isolation makes this far easier. It works on either DC or DCC, gives you 16 screw terminals for droppers, and adds a unique isolate function that switches off sections to help with fault finding after a short. Red and green LEDs show incoming polarity or the presence of a DCC signal, and a pass-through connector lets you chain boards. Maximum current per board is 5A, with a recommended supply of 5-16VDC or DCC.
Browse our Cable and Wire and Components collections for bus wire, droppers and connectors.
Category |
What it does |
Check before buying |
|---|---|---|
Cable and wire |
Carries power and signal around the layout |
Gauge, current rating, insulation |
Connectors |
Joins wire runs and droppers |
Current rating, fit |
Power distribution |
Splits supply to sections |
Voltage, current, DC or DCC |
DCC systems |
Controls locomotives digitally |
Scale, decoder interface |
Stay-alives |
Keeps locos running over dirty track |
Decoder compatibility, space |
LEDs and lighting |
Adds realism to buildings and streets |
Voltage, resistor value |
Track cleaning |
Keeps rails conducting |
Track type, frequency of use |
DCC Systems, Decoder Accessories and Stay-Alive Modules
DCC gives you independent control of each locomotive, and it is the single biggest upgrade most layouts can make. It is not automatically better for every layout, though. A small shunting plank with two locos can run beautifully on DC.
If you are weighing the two, our free helpsheets cover it plainly: Hobby Trax Helpsheet - Analogue vs Digital - The Basics and Hobby Trax Helpsheet - Upgrading your layout from DC to DCC.


One practical gap in many DCC setups is the programming track. The TCS LT-50 DCC Programming Track Switch adds a switchable programming track to a TCS LT-50 command station, which lacks dedicated programming terminals. Installation is plug-and-play with no soldering, and the 3-position switch powers the main track, a separate programming track, or isolates everything for maintenance.
Stay-alive modules keep locomotives moving across dead frogs and dirty rail. They are not universal: check decoder compatibility and whether there is physical space inside the body before ordering. Explore our DCC Systems and Stay-Alives collections.
Beginner Model Railway Wiring: What to Check Before You Connect Anything
Beginner model railway wiring fails for predictable reasons. Almost always it is a mismatch between what the power supply delivers and what the components expect.
Work through this before you connect anything:
- Confirm the supply voltage and whether it is DC or DCC
- Check the current draw of every device on the circuit
- Verify the scale and gauge match your track
- Confirm the decoder interface type fits your locomotive
- Measure the physical dimensions against the space available
- Read the manufacturer's instructions before powering up
Our Hobby Trax Helpsheet - DCC Bus wiring answers the two questions beginners ask most: what thickness wire to use, and where to run the cables.
LEDs, Streetlights and Model Railway Track Cleaning Tips
Streetlights and LEDs are the cheapest realism upgrade on any layout, and the easiest thing to destroy. The resistor is not optional. Without it, the LED draws far too much current and fails almost immediately. Size the resistor to your supply voltage and the LED's forward voltage, and check the polarity before soldering. Most of our LEDs come with a resistor included; our tiny LED kits are prebuilt.
Hobby Trax Helpsheet - Analogue vs →
For track cleaning, start with the least aggressive method that works. A track rubber removes oxidation, but too much pressure scratches the rail and attracts more dirt. Follow with a lint-free cloth and a light cleaner. Clean the wheels too, since dirty wheels undo a clean rail in minutes.
Check our Tools and Maintenance collection for cleaning gear, and our Scenery range for lighting to suit buildings and streets.
DCC Decoder Installation Guide: Matching Decoders to Your Locomotives
A DCC decoder installation guide starts with one question: what interface does your locomotive have? Older models may need hard-wiring, while newer ones often have a plug-in socket.
Match these before you buy:
- Interface: 8-pin, 21-pin, Next18 or hard-wire
- Size: the decoder must physically fit, especially in small shunters
- Current rating: must exceed the motor's stall current
- Functions: count how many lighting outputs you need
- Sound: only if the body has room for a speaker
Get the interface wrong and you will be soldering when you did not need to. Get the current rating wrong and the decoder will fail under load. If you are unsure, ask us before ordering. We would rather answer a question than process a return.
Modular Model Railway Viaduct, Platform System and Scenery Options
Modular products let you configure and expand a layout without rebuilding it. That flexibility matters most when a layout grows, or when you want a scene that can be lifted out for maintenance.
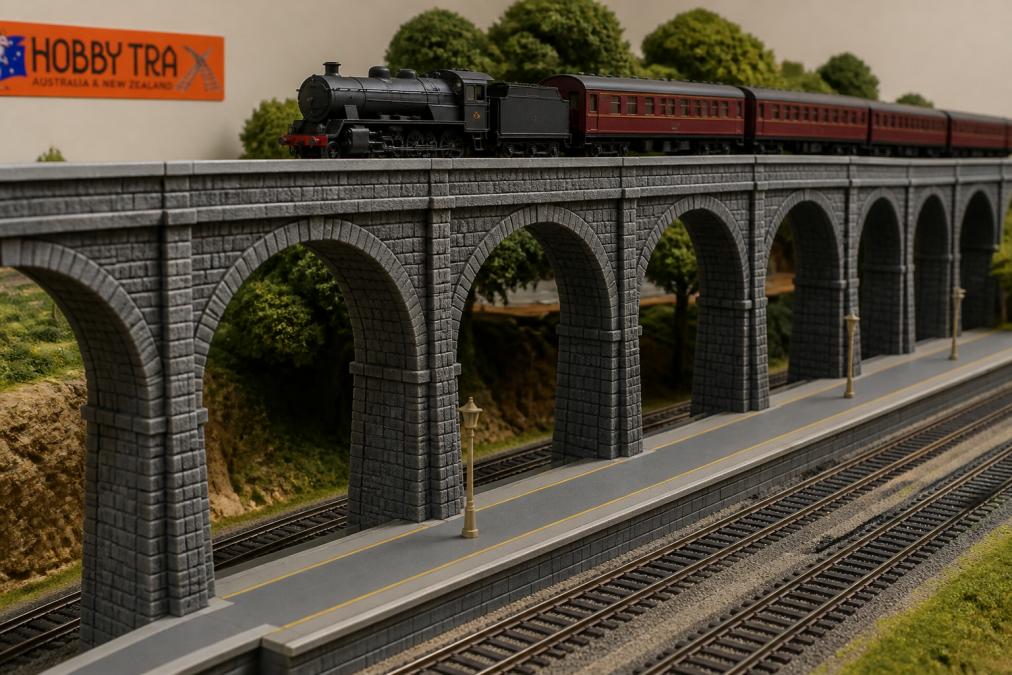
Our modular range includes the Modern Modular Viaduct Bridge System, the Modular Brick Viaduct Bridge Kit in single or double track, and the Modular Model Railway Platform System. Each is designed to be assembled and extended, so you can start with one section and add more as the layout develops.
Browse our Scenery collection for the surrounding detail.
Tools, Maintenance, Turnouts and Pre-Owned Trains
If you have built something you are proud of, send us a photo. We enjoy seeing what our customers create, and your layout might help another modeller solve the same problem.
Frequently Asked Questions
What is the main difference between DC and DCC for model railways?
DC (analogue) controls speed and direction through the track voltage, so only the section of track you have switched on moves. DCC sends a digital signal through the same rails and each locomotive has a decoder with its own address, so you can run several trains independently on the same track. Both systems use similar wiring principles, but DCC benefits from a proper bus and droppers. Our free helpsheet Analogue vs Digital covers the basics if you are deciding which way to go.
Do I need special wiring for a DCC model railway layout?
You can start with simple connections, but a bus wire with droppers to each section gives far more reliable running as your layout grows. Use wire thick enough for the current your controller supplies, keep the bus pair twisted or closely paired, and fit isolation so a short in one section does not shut down the whole layout. The Hydra 16-Channel DC/DCC Bus Bar handles both DC and DCC, gives 16 output terminals and an isolate function for fault finding, and suits supplies from 5-16VDC or DCC up to 5A per board.
How do stay-alive modules improve locomotive performance?
Stay-alive modules store a small amount of energy and release it when track pickup is briefly interrupted, which keeps the decoder and motor running through dirty rail, dead frogs and short insulators. The result is smoother slow-speed running and fewer stalls on points. They are most useful on small shunters and short-wheelbase locomotives where pickup is limited. Check your decoder supports a stay-alive connection and that there is physical room inside the body before ordering.
Are modular bridge systems compatible with all track brands?
Not automatically. Modular viaduct and platform sections are designed around particular track geometry, so check the track code, sleeper height and the span dimensions against your own track before buying. The same applies to platform edges and bridge abutments, where a few millimetres of difference shows. If you are unsure, measure your track and compare it with the product listing, or contact us with your track brand and scale and we will help you work out what fits.
How do I choose the right decoder for my locomotive?
Start with the interface: many modern locomotives have an 8-pin or 21-pin socket, while older models need a wired decoder. Then match the current rating to the motor, allow headroom for lighting, and confirm the physical size fits the body shell. If you want sound, choose a sound decoder and a speaker that fits. Bring your locomotive details to us and we can point you to a suitable decoder and the accessories to go with it.