

Table of Contents
- Why Modular Model Railway Bridge Kits Suit HO/OO Layouts
- Choosing Between Modern, Brick and Plate Girder Styles
- Planning Location, Span and Pier Spacing
- HO Scale Bridge Construction: Clearance and Track Centres
- Dry-Fitting Modules Before Permanent Fixing
- Model Railway Track Alignment Across Joins and Transitions
- Approaches, Abutments and Model Railway Scenery Techniques
- Painting and Weathering Without Obstructing the Track
- Checking Stability, Access and Expansion
- Common Mistakes and How to Avoid Them
- Frequently Asked Questions
Last Updated: 5 October 2026
Why Modular Model Railway Bridge Kits Suit HO/OO Layouts
A modular model railway bridge is a bridge built from separate, repeatable sections that you assemble, place and later rearrange on your layout.
The appeal is simple. A fixed, one-piece bridge commits you the moment you glue it down. A modular model railway bridge kit lets you test the span, adjust the pier spacing, and change your mind six months later without demolishing half a hillside.
Below, we cover how the three systems differ, how to measure clearance and track centres, the build sequence we recommend, and the mistakes that catch out first-time bridge builders. If you have ever glued a bridge in place and immediately regretted the height, this one is for you.
Choosing Between Modern, Brick and Plate Girder Styles
Style choice comes down to the era and region you are modelling, not personal taste alone. A modern concrete viaduct suits contemporary layouts, brick reads as Victorian or Edwardian, and a plate girder bridge OO gauge section fits almost any period from the 1900s onward.
Each HobbyTrax system is a separate kit with its own components. Do not assume parts from one system connect to another unless the product page confirms it, because the pier and deck interfaces differ between designs.
System |
Best For |
Track Options |
Look |
|---|---|---|---|
Contemporary elevated lines |
Single or double |
Clean concrete piers and deck |
|
Modular Brick Viaduct Bridge Kit |
Victorian and Edwardian scenes |
Single or double |
Brick piers with arched spans |
Industrial and mainline scenes |
Single track |
Steel plate girders on supports |
Modern Modular Viaduct System
This is the pick for layouts set in the last few decades. Clean lines, plain surfaces and a simple assembly make it forgiving for beginners, and it pairs well with modern rolling stock and catenary. Check the product page for the exact module lengths and pier heights before you commit to a span.
Modular Brick Viaduct Bridge Kit
The brick viaduct is the classic look most people picture when they hear "HO OO viaduct". It is available in single or double track versions, so it suits a main line as easily as a branch. Brickwork rewards a bit of weathering later, which we cover further down. Very flexible items on the product page.
Modular Plate Girder Bridge
A plate girder bridge OO gauge module gives you that riveted steel look, ideal for crossing a road, a creek or a yard throat. It is single track only, so plan your track centres around that. The open structure also makes it easy to see and clean the railhead underneath. Check it out.
Planning Location, Span and Pier Spacing
Plan the bridge before you cut any baseboard. The location decides the span, the span decides how many piers you need, and the piers decide how much scenery you are building around them.
Work through these in order:
- Mark the crossing point on the baseboard and measure the gap you need to clear.
- Decide whether the line stays level or climbs, and set your maximum gradient first.
- Divide the total span by your chosen pier spacing to get the number of piers.
- Check that each pier lands on solid baseboard, not over a void or a lift-out section.
- Sketch the approach embankments on both sides before you fix anything.
Keep gradients gentle on a bridge approach. A climb that looks fine on paper can stall a short-wheelbase locomotive on a curve, so test with your longest and your shortest loco before you commit.
HO Scale Bridge Construction: Clearance and Track Centres
Clearance is the measurement that ruins the most bridge builds. Measure from the railhead to the underside of the bridge deck, then add a margin for your tallest item of rolling stock, including pantographs and any double-stack loads.
Track centres matter just as much on a double track bridge. The gap between the two tracks must stay consistent through the bridge and onto the approaches, or long coaches will clip the parapet on the curve into the span.
A few checks worth doing with a ruler and a test vehicle:
- Run your tallest loco and tallest wagon under the bridge before fixing.
- Check side clearance at the tightest point, not the average.
- Confirm track centres match on both sides of the bridge.
- Leave a little headroom for future rolling stock you have not bought yet.
Dry-Fitting Modules Before Permanent Fixing
Dry-fit everything first. Lay the modules in place, add loose track, and check the alignment before a single drop of glue goes down. This is the stage where you find the problems cheaply.
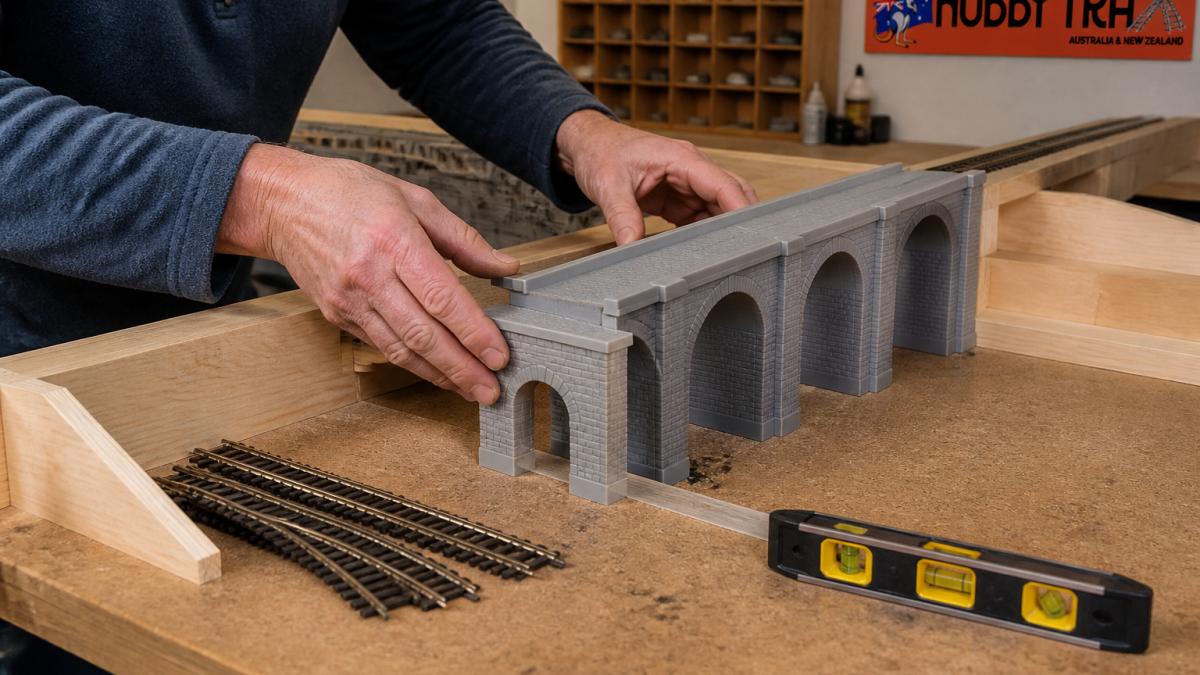
Set a small spirit level across the deck and along the track. Check the height at each pier, not just the ends.
Once the dry fit looks right, mark the pier positions with a pencil so you can return them to the same spot after any adjustment.
Model Railway Track Alignment Across Joins and Transitions
Track alignment across a bridge join is where smooth running is won or lost. The rail must stay level and in line as it leaves the baseboard, crosses the abutment, and runs onto the bridge deck.
Support the track right up to the join. A rail that floats for even a few millimetres will dip under a heavy loco and cause a derailment.
Our Track Products range includes the joiners and sections you need to keep this transition clean, and matching your Turnouts to the same standard avoids a mismatch at the bridge approach.
Approaches, Abutments and Model Railway Scenery Techniques
The bridge only looks right if the ground meets it properly. Abutments at each end should sit square to the track and support the first bridge module, and the embankments should rise to meet them at a believable angle.
Good model railway scenery techniques for a bridge approach:
- Build the embankment in layers so you can check clearance as you go.
- Use a retaining wall where the ground would otherwise be too steep.
- Blend the abutment into the terrain with filler, then texture over it.
- Leave a removable section if you need access underneath.
Our Scenery range covers the ground cover, retaining walls and foliage that tie the bridge into the landscape. A little scatter and a few bushes around the pier bases hide the joins and make the structure look like it has always been there.
Painting and Weathering Without Obstructing the Track
Weathering makes a bridge look real, but paint in the wrong place stops trains. Mask the railhead and the inside faces of the rails before you spray or brush anything near the track.
Keep these rules in mind:
- Mask the railhead completely, then clean it again after painting.
- Weather the piers and deck before final assembly where you can.
- Use thin washes rather than thick coats so detail stays sharp.
- Let everything dry fully before running stock.
A brick viaduct takes a wash well, with grime collecting in the mortar lines. A plate girder bridge suits a little rust streaking around the rivets. Keep it subtle. Overdone weathering looks like damage, not age.
HobbyTrax have just signed a deal with an Australian hobby paint manufacturer to supply authentic weathering colours. Watch this space for more; if you are on the newsletter email group, you will be first to know.
Checking Stability, Access and Expansion
Once the bridge is fixed, run a full test session before you call it finished. Push a train across at speed, then slowly, and watch for any movement in the modules or the track.
Check these points:
- Every module sits firm with no rocking.
- Rail alignment is level across every join.
- You can reach under the bridge to clean track and retrieve a derailed wagon.
- The structure survives a gentle nudge without shifting.
Access matters more than most builders expect. A bridge that looks beautiful but traps a derailment underneath will frustrate you for years.
Expansion is the quiet advantage of modular construction.
Our Tools and Maintenance range has the track rubbers, gauges and cleaning gear that make this final check quick, and it is worth keeping a track cleaning wagon on hand for the hard-to-reach sections.
Common Mistakes and How to Avoid Them
Most bridge problems trace back to a handful of avoidable errors. Here are the ones we see most often, and the fix for each.
Mistake |
Why It Hurts |
Fix |
|---|---|---|
Gluing before dry-fitting |
Cements a bad alignment |
Dry-fit and test first |
Forgetting clearance margin |
Tall stock strikes the deck |
Measure with a gauge |
Unsupported rail at joins |
Dips and derailments |
Support right to the join |
Painting the railhead |
Poor contact and stalling |
Mask, then clean |
No access underneath |
Trapped derailments |
Keep a span removable |
Mixing system parts |
Modules will not seat |
Confirm compatibility first |
A numbered build sequence keeps the whole job tidy:
- Plan the location, span and pier spacing.
- Measure clearance and track centres.
- Dry-fit all modules and loose track.
- Check level and alignment at every pier.
- Fix the piers and abutments.
- Lay and join the track across the transitions.
- Build the approaches and scenery.
- Weather the structure with the railhead masked.
- Test, then check access and stability.
Frequently Asked Questions
How do I calculate rolling stock clearance for a model railway bridge?
Measure your tallest and widest item of rolling stock, then add a safety margin of a few millimetres on each side and above. Check clearance at every point where the bridge narrows, including parapets and truss sides. Run your longest locomotive and any double-stack or tall wagon through the bridge on a test length of track before fixing anything permanently. If in doubt, build slightly wider than you think you need.
What is the difference between a viaduct and a plate girder bridge in HO scale?
A viaduct uses a series of arches or piers to carry the track across a long span, often with a brick or modern concrete look. A plate girder bridge uses deep steel side beams to span a shorter gap, usually with a single clear opening. Viaducts suit sweeping valley crossings, while plate girder bridges work well over roads, rivers or short dips. Both styles are available as modular kits, so you can combine them on one layout.
How do I ensure track alignment across modular bridge sections?
Dry-fit every module and track piece before gluing or screwing anything down. Use a straight edge or a length of track across the joins to check for kinks and height differences. Solder or use rail joiners at each join, then test with a locomotive at slow speed. If a join sits slightly proud, sand or shim it until the rail tops are level. Consistent alignment here prevents derailments later.
Can I combine different modular bridge systems on one layout?
Only combine systems where the product pages confirm the parts connect. Do not assume a brick viaduct section will clip directly to a plate girder bridge without checking. If the systems are not confirmed as compatible, use a short section of track on a solid abutment or embankment between them. That way each bridge stands on its own and the track still runs smoothly across the gap.
What are the best techniques for weathering model railway bridges?
Start with a light wash of thinned brown or grey acrylic to pick out mortar lines and panel details. Dry-brush a lighter shade on edges and rivets to suggest wear. Keep paint off the rail tops and out of the flangeways so wheels and pickups stay clean. Work in thin layers and let each dry before adding the next. A matt varnish at the end protects the finish without a glossy shine.
Building a bridge that looks right and runs flawlessly takes planning more than skill, and the modular approach gives you room to get both. If you are unsure how many modules or which style suits your layout, get in touch with the HobbyTrax team and we will help you work out the parts you need. We would also love to see your finished bridge, so send us a photo of your layout and the solutions you came up with.